Pink, small, and punctual,
Aromatic, low,
Covert in April,
Candid in May,
Dear to the moss,
Known by the knoll,
Next to the robin
In every human soul.
Bold little beauty,
Bedecked with thee,
Nature forswears
Antiquity.
This year at Hand in Hand Community Farm, we're putting in a new, experimental herb and flower garden. So far we've compiled a nice list of both that includes (click on the links for pictures and details on each herb/flower):
- Anise
- Aster, New England
- Balm, Lemon
- Basil, Medinette
- Bayberry
- Bergamot, Wild
- Calendula
- Caraway
- Chamomile, German
- Chives
- Cinquefoil
- Cilantro, leisure
- Cumin
- Dill, Green Sleeves
- Echinacea, Ruby Giant
- Fennel, sweet
- Horseradish
- Lavender, English
- Marigold, Orange Gem
- Marigold, French
- Mint, English
- Mint, Chocolate
- Nigella
- Oregano, Greek
- Parsley, Italian
- Poblano chili pepper
- Scotch Bonnet pepper
- Poppy, California
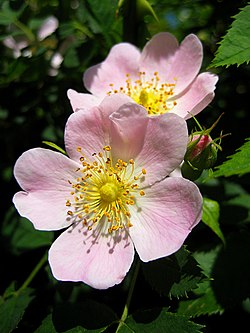
- Rose, Dog
- Rosemary
- Sage, Clary
- Sage, Garden
- Sage, White
As for flower choices, English lavender was an easy one, as it's a favorite of our Humble Farmer. California Poppies, on the other hand, are the Farmer Babe's favorite...and both are reputed to be exceptional producers, organically speaking. Dog roses are simple and beautiful; their smell is intoxicating and heady. New England Asters are adorable pink and purple wildflowers that make lovely, sweet-smelling table bouquets. And Marigolds are not only pretty, but are reputed to act as a natural deterrent to the deer that inhabit the woods outside of the farm.
Ever thought of drying your own herbs? It's less difficult and complex than you might think. Just follow these steps, and you'll have a fragrant, dried bouquet of your own:
- Cut healthy branches from your herb plants.
- Remove any dry or diseased leaves.
- Shake gently to remove any insects.
- If necessary, rinse with cool water and pat dry with paper towels. Wet herbs will mold and rot.
- Remove the lower leaves along the bottom inch or so of the branch.
- Bundle 4 - 6 branches together and tie as a bunch. You can use string or a rubber band. The bundles will shrink as they dry and the rubber band will loosen, so check periodically that the bundle is not slipping. Make small bundles if you are trying to dry herbs with high water content.
- Punch or cut several holes in a paper bag. Label the bag with the name of the herb you are drying.
- Place the herb bundle upside down into the bag.
- Gather the ends of the bag around the bundle and tie closed. Make sure the herbs are not crowded inside the bag.
- Hang the bag upside down in a warm, airy room.
- Check in about two weeks to see how things are progressing. Keep checking weekly until your herbs are dry and ready to store.
- Store your dried herbs in air tight containers. Zip closing bags will do. I like to use small canning jars.
- Be sure to label and date your containers.
- Your herbs will retain more flavor if you store the leaves whole and crush them when you are ready to use them.
- Discard any dried herbs that show the slightest sign of mold.
- Place containers in a cool, dry place away from sunlight.
- Dried herbs are best used within a year. As your herbs lose their color, they are also losing their flavor.
- Use about 1 teaspoon crumbled dried leaves in place of a tablespoon of fresh herbs.
References
http://gardening.about.com/od/vegetablepatch/a/DryingHerbs.htm


No comments:
Post a Comment